Showing posts with label web design. Show all posts

Wednesday, 25 May 2011

Website Design done

The Index/ home page with a little bit about the company on it and some of the latest work

The over all design of the website is really simple partly because I dont know how to make complicated website ( mostly that) and I looked at some graphic design studio websites and they are all really simple. a lot are just either on white background or black with small texts.


I used a lot of the rollover image on the website and i saw some on another website and its a nice way of highlighting the work and also its one of the only things I know how to do on dreamweaver really


I just used examples of my own work on my website to demonstrate how they would go on.

The grid on this webpage took absolutely ages but It probably my favourite page

Again, here i used the rollover image to show the members of the company


very simple contacts page

web design


some layout design sketches for the web.

the page spec is 600 x 800
and I remember simon mentioning that it would make things a lot easier if you write down the measurements for each page on paper and just follow that.

I did that for the template and found it to be extremely useful...

probably should have done it with all the other pages.....

Web Design

This is my template. Its pretty simple really but it still tok absolutely ages

I decided to just use the logo Nick designed for out enterprise group. The company is meant to be a high end sophisticated print studio. So, ( not only because I don't know how to use dreamweaver) I wanted to keep the website nice and clean. I think it still looks pretty sophisticated!

sorting out all the other pages which were made after the template page was made
I decided to utilize pretty much the only skill i learnt from the web session and use lots and lots of 'rollover images'


So this is what the template looks like on the browser


This the the home page

It took me quite a while to figure out tables so this home page and the template were the ones that took all day pretty much.

The home page consists of a short introduction to our company and a couple of images of our most recent work


Aligning the pictures in this one was also quite tricky. A lot of the times I had to change the numbers manually into the code section. I dont know why but sometimes things just didnt do as I commanded them to when pressing the buttons.


alignment sorted
this is the works page. It it were a real website , the visitor would scroll down the browser to look at more work


Thursday, 5 May 2011

web design session 3


Continuing with making your own website create multiple web pages and link them using hyperlinks putting content onto website

purchase web space and domain names
how to upload and manage a website


now...need to make a Dreamweaver Template

We have a website with five pages and all we have done is the home page. ( it would take a long time to make up 5 webpages) therefore we make up a dream weaver template which is a .DWT file
ie. convert .html > . dwt

to convert the html page to a dwt

indert > template objects > editable region

make sure you've clicked on the area


the green box is the editable area

to complete this.... click 'save as template....)


now....create a new page
file >new > blank template


EVERY webpage needs to have been created from a template therefore you need the index page again as the first one was made from scratch

so now the index page is now made from the index page.

create all the other pages ( work, about, contact etc) from the template
Linking them together
Go onto the template then link them to the index page

make sure you're on the index window

change content of each page in order to differentiate between the different pages


when you're putting website together its unlikely for you to have all the information needed and usually the web designer would just use larem lipson to show client what the content may look like


if you paste the text into the code part > won't recognize the formatting

unlike when you paste the text straight into the views


Padding:

create table in editable area > create padding ( 20) padding

add width
add height ( via code)


Make sure you change the format

UPLOADING IMAGES
  • insert image

if you want to create a sort of gallery , they're really hard to code therefore there are developers to make these galleries and tey give you a demo of how to code your wanted galleries and you can customize it as well

http://www.huddletogether.com/projects/lightbox2/

use the images that was given and edit them in photo shop into something more persona

buying domain name:

http://www.123-reg.co.uk/


THEN

you need to buy web space

http://www.one.com/en/

free to get and 90p a month. with unlimited bandwidth


connect to server so you can edit your web page somewhere else

manage site...


You user name will generally b the same as the ftp addressee but if its different then they will tell you when they send it.

to make it go live t, click the little button that will show you both locations. initially there will not be anything in the remote server. You then click the button with two plugs , it will eventually connect.

then if you come back i week and want it to change something small you then just drag the edit across

to get back to the top of google is to update your website everyday. and you do this by uploading dummy files on the website.

all this can b done on dreamweaver.

if you plan on leaving ( to go travelling ) etc ad will nto be able to update you website..


http://www.cushycms.com/en

content management service


Thursday, 28 April 2011

web design session 2

Everything on websites are made up off HTML which is the most basic code for websites

There are different types of codes ( you can choose the style on the welcome menu bar when you open up dreamweaver)
html - most standard / basic web language
Code fusion- just not used
PHP- used to communicate bewteen data base and websage. Eg. online shopping sites use them. Amazon > they don't have individual webpages for everything they sell as that would take ages for everything to load. Everything is stored as data on a spreadsheet and all that data gets pulled up when you click on the item
CSS- (cascading style sheets) when create webpage with basic features eg. black, helvetica, 12 pt, instead of having to put the code in on every webpage of your site, you just need one on CSS and link that to all the other html's

JAVA script- for really advanced coding eg. online games, really complicated websites
XML- similar to php

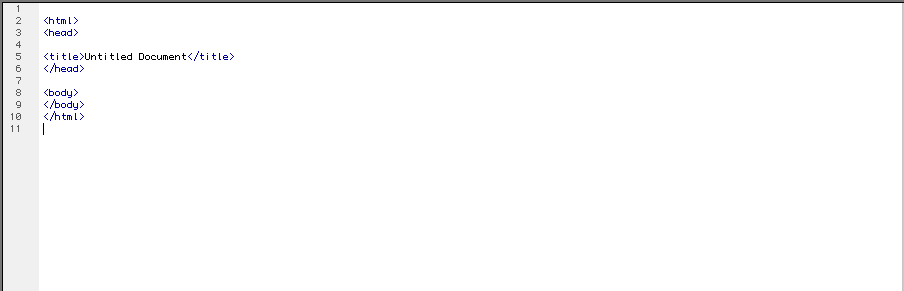
Creating a new HTML document:

CODE | SPLIT | DESIGN

in the panel menu, the files menu is the most important one

about the coding...........


isnt actually visible on your webpage, its just a code that is used so that your webpage shows up in search engines. key words are put into this code so when people type in the most commonly searched word, your website comes up


doesnt matter if you have nothing on your webpage, on the coding page, there will already be codes on it. eg. at the beginning means that from that point on word, this page will be talking in HTML ( need to let internet and dreamweaver know )
and means the end


every code when has a slash at the front means that its the end of thatn eg.
= anything in head tag isn't visible just useful. eg the meta code,
and then you have to end it

< body> = everything between that will be visible on the website


when making a website you need to
-make a root folder- can name them anything then sub folders

when yo finish a website, you need to buy a webpage and add server

FTP address ( for emails)

save your home page as index which is a standard name. this is so that your home page is the first thing that pops up when someone type in your web address
making the layout :
First bpx- 800 px x 600 px

(everything has to fit in the initial box)
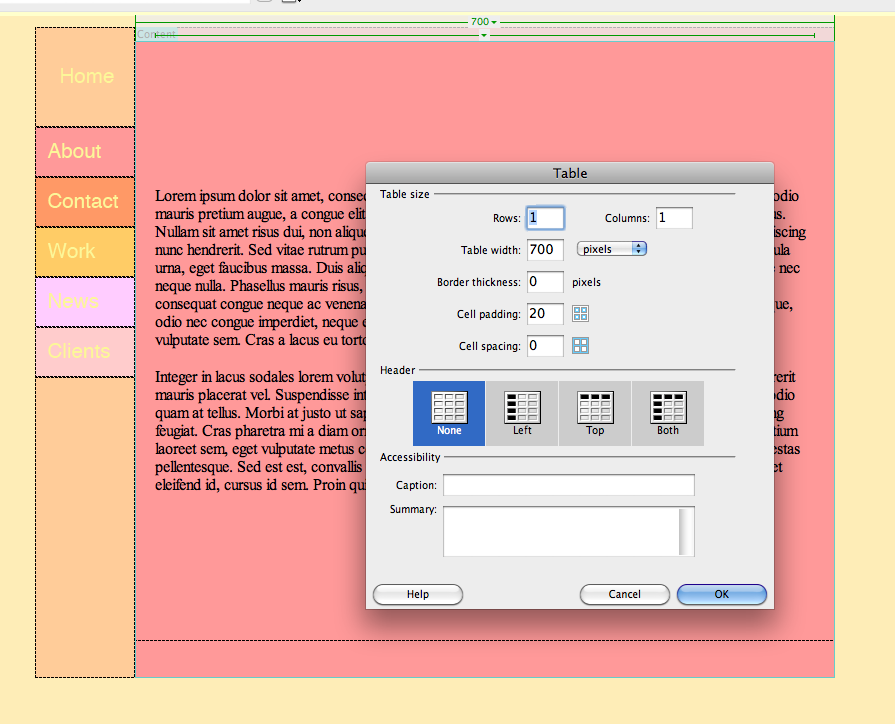
Insert > Tablr


NOTE : if something is nothing , have to tell dream weaver that its nothing

box created - not height yet in rhw code but
so to add row --------


&nbspi = nothing . but you still need it so internet and dream weaver needs to know

therefore to add in high....space after width, drop down menu > click height


add features to cell > not in the over all table code but in the cell part


The background is automatically white so if you want to change it...change the code where the overall page is applied to


splitting you columns and rows into cells....

when you click the split columns, it always automatically make it split 50/50
co to change that...click the particular cell and change its widght

but you also have to change the remaining width of the other cell ( telling dreamweaver there's nothings when there's nothing)


dividing columns into rows../.do the same thing but with row height


Making buttons....

create you type/ image on photoshop and make two layers of the same type for the roll over effect

can change the color of the word, typeface or anything. save each layer separately ( hide one while you save the other)

save for web and devices on a transparent background and save as PNG ( JPEG is not transparent)


When inserting the button, select

insert> image object>roll over image


when the preload rollover box is ticked that means that the rollover image will appear straight away on your website. so you pretty much always want that to be ticked ( JAVA scripted )

The alternate text field is mandatory by law> its the small yellow box that appears when you float the cursors on the particular button